

Smart hands support is only as good as the ticket behind it. The engineer who turns up at the rack has never seen your environment, doesn’t know your customer and can’t read your mind. If the ticket says “check server, customer reports issue”, you’ll get a check, a photo and not much else. If it says which server, which port, what to do, what not to touch and what you need back, the job usually gets done in one visit.
This post is about scoping: turning a vague request from your customer or NOC into a ticket a smart hands technician can follow without phoning you every ten minutes. It’s written for the service delivery and operations people who raise these tickets every week.
Why smart hands tickets go wrong
Most failed visits aren’t skill problems. They’re information problems. The common ones look like this:
- The device isn’t identified properly. “The Dell in rack 4” is no help when there are six Dells in rack 4.
- The task is a goal, not an action. “Fix the connectivity” could mean reseating a cable or rebuilding a switch.
- Nobody booked access, so the engineer waits in reception while security looks for an authorisation.
- The part hasn’t arrived, went to the wrong loading bay, or carries the wrong part number.
- There’s nobody on the phone to confirm the result, so the engineer can’t tell whether the change worked.
- The ticket doesn’t say what’s out of scope, so the engineer either stops too early or goes further than you wanted.
Every one of these can be fixed at the desk before anyone travels. The fix is a ticket that answers the engineer’s questions before they ask them.
What a well-scoped smart hands support ticket contains
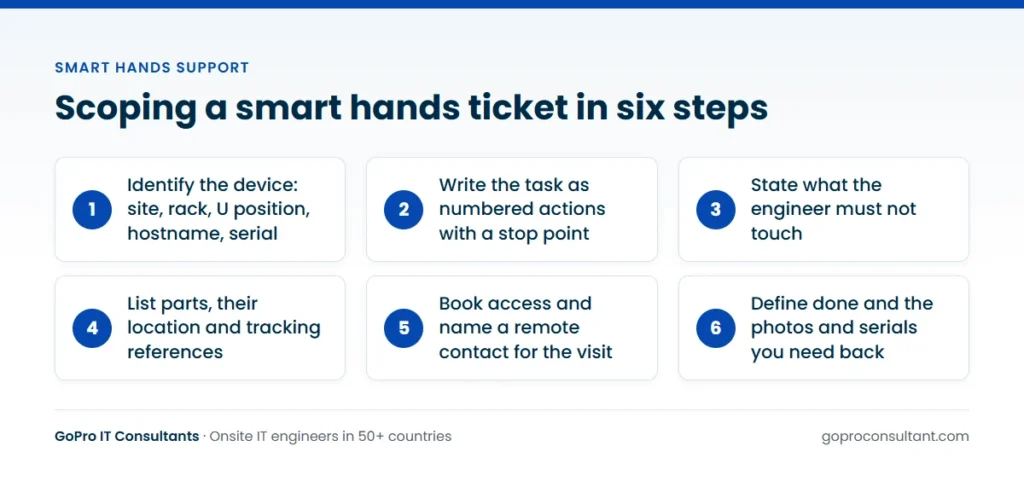
Treat the ticket as the engineer’s only briefing. It should stand on its own, so that someone who has never spoken to you could pick it up and do the work. The same five blocks apply in a colo hall or an office comms room. They’re also what we ask for when partners book data centre support and smart hands visits.
Location and identification
Full site address, data hall or suite, cage, rack or cabinet ID, and the U position of the device. Add the hostname, asset tag and serial number, plus a photo or rack elevation if you have one. Serial numbers matter most, because they’re the one identifier the engineer can check against the label on the chassis.
The task
What you want done, written as actions: which component, which port, which cable, in what order.
Access and contacts
Who authorised the visit, the access reference, the time window and a named contact who’ll answer the phone during the visit. If your customer’s operations team must approve each step, say so up front.
Parts and tools
Part numbers, where the part is (on site, in transit, in a locker, with the vendor), the tracking reference and any tools that aren’t standard. If the failed part goes back to the vendor, say how it should be packed and labelled.
Expected outcome and evidence
What success looks like, who confirms it and what you need in the report: photos of front and rear, labels, LED status, serial numbers in and out.
Write the task as steps, not as a goal
The biggest improvement most teams can make is to break the task into numbered steps. “Replace failed drive in storage array” leaves a lot open. Steps close it down:
- Call the remote contact and confirm the array is ready and the drive is marked for replacement.
- Find the array by asset tag and serial number in rack B12, U20 to U23.
- Identify the drive by bay number and amber fault LED. Photograph it before touching anything.
- Remove the failed drive and fit the replacement from the parts locker, part number as listed.
- Wait for the remote contact to confirm the rebuild has started.
- Photograph the bay, record both serial numbers and pack the failed drive for return.
Steps also give you checkpoints. If step 3 doesn’t match (no amber LED, or a different bay), the engineer stops and calls before pulling anything. That single instruction prevents the most expensive mistake in a storage swap: pulling a healthy drive from a degraded array.
Not every ticket needs to read like a run book. A power cycle or a visual check needs three lines. Anything with a risk of data loss or downtime deserves numbered steps and at least one stop point.
Draw the scope boundary
A good ticket says what the engineer may do and also what they must not do. Without that line, a capable engineer will often try to help, and helping can mean a change you didn’t plan for. Typical boundaries:
- Don’t power off anything other than the named device.
- Physical work only. The remote team makes all configuration changes.
- Don’t move or re-route cables outside the named patch panel.
- If the fault isn’t what the ticket describes, stop, photograph it and call the contact.
- Don’t swap a part that isn’t on the ticket, even if a spare is sitting on the shelf.
The boundary protects you commercially too. If the job turns out bigger than scoped, the engineer records what they found and what’s needed. You then decide whether to extend the visit or raise a new ticket, rather than finding out on the invoice.
Book access, timing and a remote contact
Data centres and comms rooms run on access lists. Put the engineer on the list before the visit, using the name on their photo ID, and include the access reference in the ticket. If the site needs notice for deliveries or for work on the floor, build that into the date you ask for.
Match the response tier to the job. A failed power supply in a redundant pair can usually wait for next business day. A down core switch can’t, and in major cities a 4-hour response is the sensible ask. Planned work such as a migration or a cabling change suits a scheduled visit at an agreed time, which can be at night or at the weekend if the change window demands it. Our field engineer dispatch service covers each of these tiers, so the choice is about the job rather than the supplier.
Then name someone who’ll be on the phone for the whole visit. Plenty of smart hands jobs need a remote person to confirm a link is up, a disk is rebuilding or a node has re-joined the cluster. If that person is in a meeting, the engineer waits, and the clock keeps running.
Agree what “done” means and what you need back
The last part of scoping is the finish line. Write down the condition that ends the job and the evidence you want. A few before-and-after examples:
| Vague request | Scoped version |
|---|---|
| Check the server | Photograph front and rear, report LED status on PSU 1 and PSU 2, note any amber lights |
| Fix the network issue | Reseat the cable in switch port 24, confirm link light, remote contact checks interface status |
| Replace the drive | Swap the bay 7 drive, record old and new serials, wait for rebuild confirmation |
| Tidy the rack | Label and dress cables from U10 to U20, photograph before and after |
| Install the new kit | Rack at U30 to U31, connect PSUs to A and B feeds, patch to switch ports 1 and 2 |
With GoPro IT Consultants, every visit produces a site visit report within 24 hours, covering photos, serial numbers, work done and anything outstanding. If you work white-label, the engineer can attend under your brand and fill in your own report template. Our guide to how white-label field services work covers that set-up in more detail.
A worked example: from customer email to finished ticket
Say your customer emails at 4pm: “Our firewall at the colo keeps dropping. Can someone look at it tomorrow?” That’s a fair request from them and an unusable one for an engineer. Here’s how a service desk would typically turn it into a ticket.
First, work out what’s actually needed. Your network team checks the logs and sees the interface to the upstream router flapping. The firewall itself looks healthy. So this isn’t a firewall job. It’s a physical check of one cable and one optic, with a possible swap if the optic is faulty.
Then fill the gaps. The customer’s asset list gives the rack and U position but no serial number, so you ask for it, or ask the engineer to read it and stop if the hostname label doesn’t match. You confirm a spare optic of the right type is in the customer’s locker at the facility, and get the locker reference. You ask the customer who will approve a brief interface outage, and agree a window early next morning.
Then write it. The finished ticket reads roughly like this:
- Where: site address, hall 2, cage C14, rack 3, U38, hostname as labelled, serial to be read and confirmed.
- Task: call the remote contact, inspect the fibre in port 1/1/49 for damage or a loose connector, clean and reseat, then wait for the contact to check the interface for ten minutes.
- Stop point: if the link still drops, swap the optic for the spare in locker L-22 only after the contact approves.
- Out of scope: no changes to the firewall, no other cables, no power cycling.
- Back to us: photos of the port before and after, optic serials in and out, link light status, time on site.
Notice what changed. The goal (“fix the firewall”) became a physical check with a decision point, the risky step needs an approval, and the evidence is named. The engineer can do this without a single call that isn’t already in the plan. This is the same discipline as any hardware break/fix visit, just tighter, because a colo cage gives the engineer fewer clues than an office.
Who owns each part of the ticket
A smart hands ticket usually draws on four or five parties, and gaps appear where nobody knew a field was theirs to fill. Agree it once per customer and write it into your process.
| Party | Supplies in the ticket |
|---|---|
| You (the ticket owner) | The task steps, scope boundary, response tier, report requirements and the final check before dispatch |
| Your end customer | Change approval, the window, device records and a person to confirm the result |
| The facility | Access approval, delivery receipt and any site rules on photos or escorts |
| The hardware vendor | The correct part, tracking reference and return instructions |
| The field engineer | Questions before travelling, the work itself and the evidence for the report |
The ticket owner is the one role that can’t be shared. One person should read the whole ticket before it goes out and confirm that every block has an answer. If your customer wants to send instructions to the engineer directly, route them through the ticket so the scope stays in one place.
Build templates for the jobs you repeat
Most teams raise the same six or seven job types again and again: drive swap, PSU swap, power cycle, re-patch, optic swap, rack and stack, and rack audit. Each one deserves its own template in your ticketing system. The template holds the parts that never change, such as the stop points, the default scope boundary and the evidence list. The person raising the ticket fills in only what’s specific: location, device, part and window.
Templates also make tickets comparable. When every drive swap uses the same steps, you can see quickly which sites or vendors cause repeat visits, and fix that rather than rewriting instructions every time. Review a template whenever a visit goes wrong because of something it didn’t ask for. That’s how the template gets better rather than longer.
Keep one rule: a template is a starting point, not a substitute for reading the ticket. If the job doesn’t match the template, write it from scratch.
Writing tickets for sites in other countries
Cross-border tickets fail in ways that local ones don’t. A few habits help.
Write plainly. The engineer may read English as a second language. Short sentences, one action per step and no internal shorthand (“do the usual on the edge box”) make the ticket safer to follow. Spell out device names exactly as they appear on the label.
State times in local time and yours. “06:00 local (05:00 UK)” removes one of the most common errors. Check local public holidays before you pick a date, because the facility, the courier or your customer’s approver may not be working.
Use local formats. Give the address the way local couriers and taxis would write it, and the remote contact’s number with the country code. If the remote contact doesn’t speak the engineer’s language, say which language the call will be in.
Allow for parts in transit. A part crossing a border can sit in customs, so don’t book the visit until the tracking shows it delivered. Our coverage across 50+ countries means the ticket format can stay the same everywhere, but the local details still have to be right.
Plan for the job changing on site
Even careful scoping can’t predict everything. The bay is empty, the part is the wrong revision, or the fault is in the cable rather than the card. Put a line in the ticket that tells the engineer whether they can make a judgement call or must ring first, and who has authority to approve extra work.
If the fix needs a part or a second visit, the engineer records what was found and what’s needed, and the return visit becomes a new ticket. That keeps each visit clear and billable on its own terms. Parts are shipped by you or your vendor, so take the exact part number from the first report before you order.
If you want something you can paste straight into your ticketing system, the pre-visit checklist for data centre smart hands turns these points into a template. And if you’re not yet sure which service the job needs, the comparison of smart hands, remote hands and field engineers is a quick place to start.
Frequently asked questions
How much detail is too much for a smart hands ticket?
Detail is rarely the problem as long as it's organised. Put identification, steps, boundaries and evidence in separate blocks so the engineer can find each one quickly on site.
Can the engineer make configuration changes during the visit?
Only if the ticket says so. Many partners keep smart hands to physical work and make logical changes remotely, which keeps the scope clear and avoids unplanned changes.
What happens if the part on site is wrong or missing?
The engineer records what was found and what part is needed, with photos and serial numbers. The return visit is raised as a new ticket once you or your vendor have shipped the right part.
Can the engineer attend under our company name?
Yes. Engineers can work under your brand and badge, use your report template and never discuss commercial terms with your end customer.
Have a smart hands ticket ready to go?
Send us one pilot ticket. No minimum commitment, and you get a site visit report with photos and serials within 24 hours.
Raise a pilot ticket