

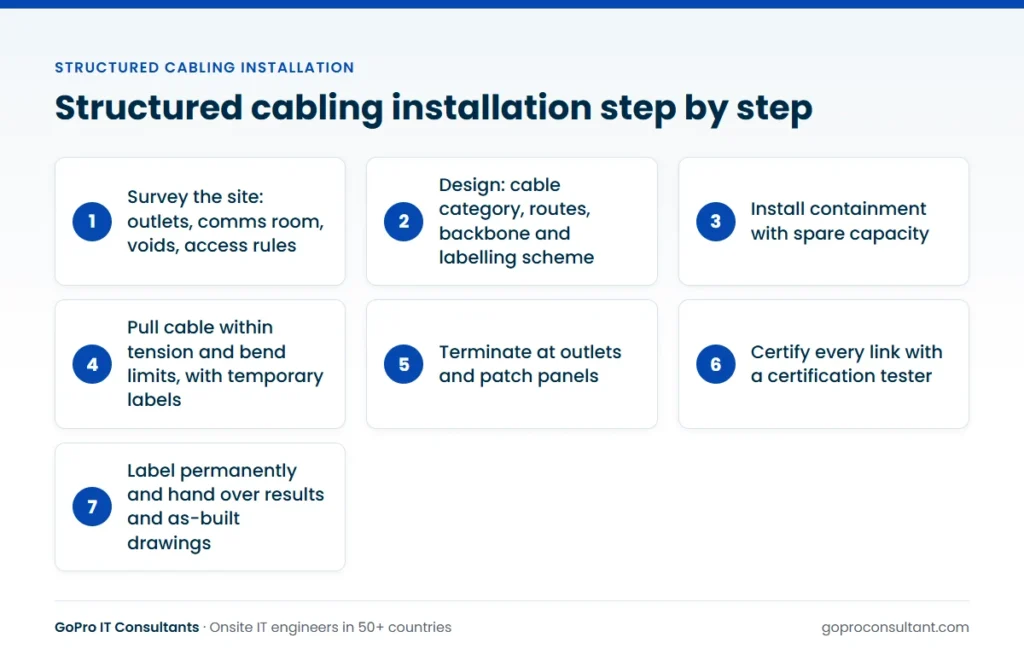
A structured cabling installation follows the same basic process on almost every site: survey, design, containment, pulling cable, terminating, testing and certifying, labelling, and documentation. Skip or rush any one of those and the problems tend to show up months later, usually as an intermittent fault nobody can trace.
This post walks through each stage, what good looks like, and what to check if you’re managing structured cabling contractors rather than doing the work yourself.
1. Survey the site
Everything starts with a walk round. The survey confirms where the comms room is, where each outlet needs to go, what containment already exists, and what’s in the way. It should capture ceiling and floor void access, wall construction, fire compartments, power in the comms room, and any building rules on working hours or permits.
In older buildings, check whether an asbestos survey is needed before anyone drills or lifts ceiling tiles. Ask for photos as well as notes. They save a lot of back-and-forth when you’re comparing quotes or briefing the installer. If wireless is part of the same project, a site survey can also cover access point locations, so data points for them go in with the rest of the cabling.
2. Design the system
Design turns the survey into a plan. It sets out:
- The outlet locations and count, on a floor plan.
- The cable category for horizontal runs, usually Cat6 or Cat6A, and whether it’s shielded or unshielded.
- Backbone links between comms rooms, usually fibre.
- Comms room or cabinet layout, including patch panels and space for switches.
- Containment routes and sizes.
- The labelling scheme and the test standard the links will be certified to.
Keep horizontal runs within the distance limits for the cable category. If a floor is too large for one comms room to serve, the design needs a second room or cabinet with a fibre link back. Plan for spare capacity in containment and patch panels as well. Adding outlets later is much harder than adding them now.
3. Install the containment
Containment is the tray, basket, trunking, conduit and hooks that carry the cable. It keeps cables supported, separated from power where needed, and protected. Good containment is installed before any cable is pulled, with enough capacity for the cable bundle plus growth.
Watch for cable laid loose on ceiling tiles or tied to other services such as pipes or sprinkler lines. It’s quicker on the day and a problem for every future visit. Where cable passes through fire walls or floors, the penetrations need fire-stopping afterwards. Make sure someone owns that task, because it’s easily missed.
4. Pull the cable
Cable is usually pulled in bundles from the comms room out to the outlets, or the other way round. The key rules are simple: don’t exceed the cable’s pulling tension, keep to its minimum bend radius, don’t crush it with tight ties, and leave a service loop at each end for re-termination. Cat6A in particular is thicker and less forgiving than Cat6, so it takes longer to pull and dress.
Temporary labels go on each cable as it’s pulled. That small step prevents a lot of confusion later, when dozens of identical cables need terminating at the patch panel.
5. Terminate at the outlets and panels
Each cable is terminated onto a module at the outlet end and onto the patch panel in the comms room. Termination quality matters more than most people think. Untwisting the pairs too far, or stripping too much sheath, can cause a link to fail certification even if it works for basic traffic.
Use components from one system where you can, especially if you want a manufacturer’s warranty, and follow the same wiring scheme throughout the site. At the cabinet, dress the cable neatly into the panels, which makes the later work on patching and switches far easier. Our post on network cabinet setup covers that side.
6. Test, certify, label and document
This is the stage that separates a proper structured cabling installation from a cable run. Every link should be tested with a cable certification tester against the category it was designed for. A certification test checks performance, not just whether the wires connect. Failed links get re-terminated or replaced and retested.
Then permanent labels go on, at both ends, following the scheme agreed in design. Finally, the contractor hands over the documentation. At a minimum, ask for:
| Document | What it’s for |
|---|---|
| Certification test results | Proof each link meets its category |
| As-built floor plans | Shows where every outlet actually ended up |
| Patch panel schedule | Maps outlets to panel ports |
| Cabinet photos | Front and rear, as left on completion |
| Warranty details | Where a manufacturer warranty applies |
Don’t sign the job off until you have the test results. If they’re missing, you have no evidence the cabling performs to the category you paid for.
Acceptance checks before you sign off
The paperwork proves the links perform. A walk round proves the job was finished properly. Before you accept the work, check:
- Every link in the test results is a pass, and the count matches the outlet schedule.
- The results were run against the agreed category and test standard, not a lower one.
- A sample of outlet labels matches the patch panel schedule at the other end.
- Cable in the cabinet is dressed, supported and not pulled tight across the front of the panels.
- Containment is fixed, lids are back on, and no cable is resting on ceiling tiles.
- Fire-stopping is complete at every penetration, with photos.
- Ceiling tiles are back, faceplates are fitted and waste has been removed.
Anything outstanding goes on a written snagging list with a date, and the final sign-off waits until it’s cleared.
Running a structured cabling installation on a live site
Many cabling jobs happen in buildings that are still open: offices with staff at their desks, shops trading, warehouses running shifts. That changes how the work is planned more than how it’s done. Agree working hours with the site before the programme is fixed, and expect noisy or disruptive tasks such as drilling, lifting ceiling tiles and moving furniture to be pushed to nights or weekends.
Phasing helps. Work one floor or zone at a time, test and hand over each phase, then move on. It keeps most of the building usable and gives you an early check on quality before the whole job is finished.
The cutover also needs a plan. If users are moving from old cabling to new, someone has to patch the new outlets, connect devices and check they work, ideally in the same out-of-hours window. A common gap is that the cabling contractor finishes and leaves, and nobody has been booked to do the patching and device checks the next morning. Decide who owns that step before the job starts.
A worked scenario: recabling two floors over weekends
Say an office on two floors needs its old cabling replaced with Cat6A, but it can’t close during the week. The survey shows the existing basket tray on the first floor has space, but the second floor’s tray is full of redundant cable. The design adds a strip-out stage on the second floor and places a new floor cabinet there, linked back to the main comms room by fibre, because some of the far desks would otherwise be beyond the copper distance limit.
Weekend one strips out the old cable on the second floor and fits the new cabinet. Weekend two pulls and terminates the second floor. The certification tests run on the Sunday afternoon, and two failed links are re-terminated and retested before the team leaves. On Monday the floor carries on using its old outlets, which are still live, while the new ones are checked.
Weekend three is the cutover: switches are patched to the new panels, desks are moved onto new outlets, phones and access points are checked, and the old patching is removed. The first floor follows the same pattern over the next two weekends. Because each floor is tested and handed over on its own, a problem on one doesn’t hold up the other, and the client gets as-built drawings and results per floor as the job goes.
Common installation mistakes and how to avoid them
Overfilled containment
Cable crammed into full tray or trunking gets crushed, and there’s no room for the next change. Size containment in the design with spare capacity, and remove redundant cable rather than adding on top of it.
Running data too close to power
Data cable laid alongside power cables or lighting can pick up interference. Keep to the separation the design and the cable manufacturer call for, and use separate containment or dividers where routes share space.
Over-tightened cable ties
Ties pulled hard deform the cable and can fail it on test. Hook-and-loop straps are kinder to the bundle and easier to undo for future changes.
Mixing components and wiring schemes
Modules from one system and panels from another, or two wiring schemes on the same site, make faults hard to trace and can void a manufacturer warranty. Fix both in the design and check them on the first floor or zone.
Labels that don’t match the drawings
A labelling scheme that changes halfway through, or drawings never updated to as-built, makes every future visit slower. Check a sample of labels against the drawings before the team leaves site.
Roles and responsibilities on a cabling job
Cabling sits between trades, so tasks fall through the gaps easily. Agree who does what before work starts:
| Party | Typically responsible for |
|---|---|
| End client or building manager | Access, permits, asbestos information, working hours, furniture plan |
| You (MSP or integrator) | Design sign-off, test standard, programme, acceptance and client handover |
| Cabling contractor | Containment, pulling, termination, certification, labelling, as-built drawings |
| Electrician or other trades | Power in the comms room, fire-stopping if not with the cabling contractor |
| Field engineers | Patching, switch and access point installs, device checks at cutover |
Fire-stopping and the cutover are the two tasks most often left without a named owner. Put both in writing. Fitting the access points after the cabling is its own job, covered in our post on access point installation.
Keeping installations consistent across many sites
If you’re cabling a chain of shops or branch offices, the process above repeats per site, so standardise it. Use one design per site type, one labelling scheme, one cabinet layout and one test standard, and require the same documentation format from every contractor. Run the first site as a pilot and use it to check the design, the timing and the handover pack before the rest are booked. Every site that looks the same is easier to support later, especially when the engineer visiting has never been there before. In data centres and larger comms rooms, our data centre support includes cabling alongside rack and stack and hardware swaps.
A short glossary of cabling terms
- Horizontal cabling: the runs from the floor cabinet or comms room out to the outlets.
- Backbone: the links between comms rooms, floors or buildings, usually fibre.
- Permanent link: the fixed cable from the panel port to the outlet, without patch leads. It’s what most certification tests measure.
- Channel: the full path from device to device, including patch leads at both ends.
- Containment: the tray, basket, trunking, conduit and hooks that carry and protect cable.
- Service loop: spare cable left at each end so a link can be re-terminated without re-pulling.
- As-built drawings: plans updated to show where outlets and routes actually ended up.
Choosing and managing structured cabling contractors
For an MSP or integrator, the cabling is often subcontracted while you own the wider data network installation. That puts you in the middle, answerable to the end client for work you didn’t do. Protect yourself by agreeing the design, test standard and documentation in writing before work starts, and checking the test results before you sign off. If the end client should only ever see your name on site, agree that up front too. Our white-label IT services let engineers work under your brand and badge, using your report template.
The work around the cabling is where we usually fit in. Our engineers handle the on-site jobs that follow a cabling install: patching, mounting and connecting switches, fitting access points, and checking devices come online. For one site, a field engineer dispatch ticket on an agreed date is usually enough. Across many sites, a multi-site rollout gives you a pilot site and then waves, with a daily tracker of photos and serial numbers. If you’re working out the budget first, see what drives commercial cabling cost.
Frequently asked questions
Should we choose Cat6 or Cat6A for a new office?
Cat6 suits most general office data and phones. Cat6A gives more headroom for higher speeds and is often chosen for wireless access points and longer-lived installations.
What is the difference between testing and certification?
A basic test checks that the wires connect correctly. Certification uses a certification tester to measure each link's performance against its cable category and produces a report.
Can new cabling be installed alongside old cabling?
Yes, but redundant old cable should ideally be removed or at least clearly marked, so it doesn't fill the containment or confuse future work.
Who is responsible for fire-stopping after cabling?
Agree it in the contract. Penetrations through fire walls and floors need to be sealed, and it should be clear whether the cabling contractor or another trade does it.
Need engineers to finish the job on site?
Our engineers patch, mount switches and fit access points after cabling, with a site visit report within 24 hours.
Book an engineer