

Installing server rack rails is usually quick, until it isn’t. Most delays come from a rail kit that doesn’t suit the rack, a rack that’s too shallow, or rails that never arrived. Dell, HPE and the other big server vendors use broadly similar rail designs, so the same checks apply whichever badge is on the front.
This post covers the rail types you’ll meet, how they fit different racks, and what to confirm before an engineer travels. For model-specific steps, always use the vendor’s own rail installation guide for that server. Rail designs change between generations, and the printed instructions in the box or the vendor’s online documentation are the reference that counts.
The two main rail types: sliding and static
Almost every rack-mount server ships with, or offers, one of two rail styles.
Sliding rails
Sliding rails let the server pull forward out of the rack on telescopic runners, so an engineer can open the lid and swap a DIMM, fan or riser without unplugging everything. They’re the normal choice for servers that will need hands-on maintenance. Most modern sliding rails are tool-less: the rail ends hook or clip into the rack posts, and the server’s chassis has studs that drop into slots on the inner rail.
Static rails
Static (or fixed) rails hold the server in place but don’t let it slide out. They’re simpler, often cheaper, and some suit two-post racks as well as four-post. The trade-off is that any internal work means removing the server from the rack entirely. That’s fine for kit you rarely open, but a pain for a server you expect to service.
| Feature | Sliding rails | Static rails |
|---|---|---|
| Server slides out for service | Yes | No |
| Cable management arm option | Often | Rarely |
| Rack depth needed | Usually more | Usually less |
| Two-post rack use | Uncommon | Some models |
| Internal work on site | In the rack | Server must come out |
Check the vendor’s compatibility details for the exact rails, because these are general patterns rather than rules.
Other mounting options
Not everything in a rack sits on server rails. Lighter devices such as switches, patch panels and small appliances often mount on front ears alone, screwed to the front posts with cage nuts. Some come with optional rear brackets so the back of the chassis isn’t left hanging. Fixed or cantilever shelves carry odd-shaped kit, desktop-format appliances and anything without its own rails. Two-post racks, common in smaller comms rooms, take front-mount or centre-mount devices and only some static rails.
Then there are universal rails sold by rack makers rather than server vendors. They can be a reasonable fallback when the vendor’s kit doesn’t suit the rack, but check two things first: the load rating against the server’s weight, and whether the server vendor supports that mounting. A server sitting on a shelf or generic rails may be fine, or it may block service access and make a later repair slower.
Choosing the right mounting option
The table below is a starting point for the decision. The vendor’s documentation for the specific server and rack still has the final say.
| Option | When it fits | Trade-off |
|---|---|---|
| Vendor sliding rails | Four-post racks, servers needing regular service | Needs depth; correct kit per model |
| Vendor static rails | Rarely opened kit, some two-post racks | Server must come out for internal work |
| Vendor adaptor or screw-in kit | Threaded-hole or unusual racks | Often ordered separately, so check lead time |
| Universal rails from a rack maker | Fallback when vendor rails won’t fit | Check load rating and vendor support |
| Fixed or cantilever shelf | Small, light or non-rack devices | No slide-out; uses U above the device |
| Front ears only | Light switches and patch panels | Unsupported rear on deeper devices |
Square-hole versus round-hole racks
Rack posts come in a few hole styles, and this matters more than anything else for rail fit.
- Square-hole racks are the most common in data centres. Tool-less rails are mostly designed around them, and cage nuts clip into the square holes for anything that bolts on.
- Round unthreaded-hole racks also take many tool-less rails, sometimes after swapping or adjusting the rail’s mounting pins.
- Round threaded-hole racks (often in older or smaller installations) usually need rails that screw in, or an adaptor kit from the vendor.
A typical failed visit goes like this: the rails are tool-less square-hole, the comms room has a threaded-hole cabinet, and nobody checked. The server sits on the floor while a different kit is ordered. Ask the site for a photo of the rack posts before you book the job. It takes two minutes and avoids the problem completely.

Check rack depth and post spacing
Rails have a supported range of distance between the front and rear rack posts. If the posts are set too close or too far apart, the rail won’t reach or won’t lock. Many racks have adjustable rear posts, so the fix may be on site, but it’s far better to know in advance.
Then check overall depth. A sliding rail with a cable management arm adds length behind the server. In a shallow rack, that can stop the rear door closing or clash with PDUs mounted vertically at the back. The vendor’s documentation normally gives the supported post spacing for each rail kit. Compare it with the rack before ordering.
Installing server rack rails: the general sequence
Every vendor’s process differs in detail, and a Dell rail installation guide won’t match an HPE one step for step. The general sequence for four-post sliding rails is still recognisable across most kits:
- Confirm the U position from the rack elevation and mark it on the posts. Counting holes wrong by one is easy, so mark it clearly.
- Check the rails are a left and right pair, and that they’re the right way up and facing forward. Most are marked.
- Fit each outer rail to the front and rear posts at the marked U, and confirm it has locked at both ends.
- Check both rails are at the same height. A one-hole difference stops the server going in.
- Extend the inner rails, or fit the inner members to the chassis if the design uses them, following the vendor’s guide.
- With two people, lift the server onto the rails, engage it, and slide it in until it locks.
- Slide it out and back once to check it runs freely and locks at both positions, then fit any front retaining screws or latches.
That’s the shape of it, not a substitute for the instructions. If you need a Dell server rack installation guide or an HPE equivalent for a particular model, the vendor’s support site is where to find it, matched to the exact server and rail kit. Include the link or PDF in the ticket so the engineer has it on site even without a signal.
Taking a server off its rails
Removal matters as much as fitting, especially on refresh jobs. The general pattern is the reverse of the install: confirm with the remote team that the server is shut down, record its position and serial, disconnect and label the cables, release the cable arm if fitted, slide the server out to its service stop, then release the rail catches and lift it clear with two people. The release mechanism varies by vendor, so the same guide that covers fitting covers this too. If the old rails are staying in the rack for a replacement, check they’re the right kit for the new model rather than assuming they are.
Cable management arms
A cable management arm (CMA) is a folding bracket at the back of a sliding-rail server. Power and network cables are strapped along it, so the server can slide forward without anything being unplugged or stretched. It’s useful for servers that get frequent hands-on work.
CMAs aren’t always the right call, though. They add depth, they can partly block exhaust airflow at the rear, and in dense racks they make cabling bulkier. Some teams skip them and use cable lengths with enough slack, routed neatly to the side, instead. Decide your standard and put it in the ticket, so the engineer isn’t guessing. If CMAs are part of the kit, mention it, because fitting them and dressing cables along them adds time.
One practical point: if a CMA is fitted, cables strapped to it need enough slack for the full slide-out. A lead that’s tight at the rear stop gets pulled out of its port the first time someone services the server.
Common rail mistakes and how to avoid them
Most rail problems on site come from a small number of slips. None of them need special skill to avoid, just a bit of care.
- Off by one hole. Each U has three holes, and starting a rail on the middle one shifts everything. Mark the U boundaries on the posts first.
- Front and rear at different heights. The rail locks at both ends but sits at a slant, and the server won’t engage. Check level before mounting anything.
- Left and right swapped, or back to front. Read the markings on every rail, even when it looks obvious.
- Not fully latched. A rail that looks seated but hasn’t clicked home can drop at one end under load. Tug-test each end.
- Leftover cage nuts in the way. Old cage nuts in a square hole stop tool-less pins seating. Clear the holes first.
- Mixed-up kits. With several servers unboxed at once, rails from different models get swapped. Keep each kit with its server until fitted.
- Binning the small parts. The screws or adaptor pieces for round-hole racks often sit in a bag in the rail box. Check the box before it goes in the skip.
And never force a server onto rails. If it won’t engage with steady pressure, something is misaligned, and forcing it bends the inner rail or damages the chassis studs.
A typical rail job during a server refresh
Say you’re replacing an older 2U server in a branch office cabinet with a current model from the same vendor. The ticket says “swap server, reuse rails”. On the day, the engineer finds the new model needs a different rail kit, the cabinet has round threaded holes, and the rear posts are set for a shorter server.
A well-prepared version of the same job looks different. A week out, you ask the site for a photo of the cabinet posts and a tape measure across the front and rear posts. You check the new server’s rail compatibility in the vendor’s documentation, find the threaded-hole kit is separate, and order it with the server. You note in the ticket that the rear posts need moving, and allow time for it. The engineer arrives with the right kit, the vendor’s guide on their laptop, and a second person booked for the lift. The old server is removed, the new rails fitted, the new server racked and tested with your remote team, and the old unit labelled for return or disposal.
The difference between the two versions is about half an hour of questions before booking. If you’re running the same refresh across many branches, that pre-check belongs in your site survey, and our hardware refresh project checklist covers where it fits in the wider plan.
What to confirm before booking the engineer
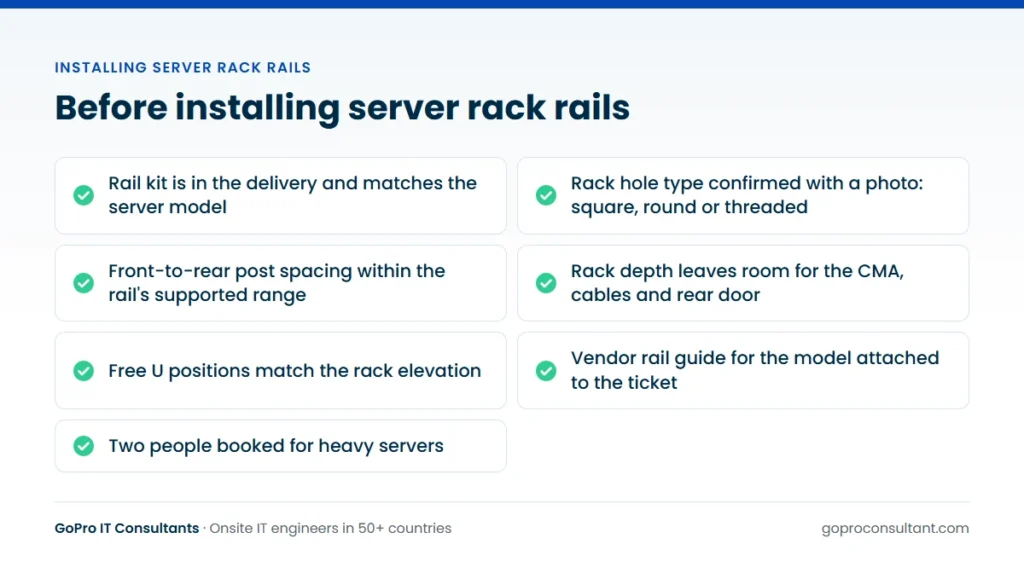
Rail problems are almost always preventable with a few questions. Before you raise the ticket, check:
- The rail kit is in the delivery and matched to the server model. Rails are sometimes a separate line item and get missed.
- The rack’s hole type, with a photo of the posts.
- The front-to-rear post spacing and overall rack depth.
- The free U positions, matched to your elevation.
- Whether a CMA is to be fitted, and the vendor’s rail guide for the model.
- That two people will be available for heavy servers.
If the job is part of a full build, our server rack installation guide covers power, airflow and labelling around the rails.
Rail terms you’ll meet
Rack unit (U): 1.75 inches of vertical rack space. Each U has three mounting holes on each post.
EIA-310: the standard behind 19-inch racks, covering width and hole spacing. It’s why most rails fit most racks, though it doesn’t fix rack depth.
Outer rail and inner rail: the outer part fixes to the rack posts. The inner part (sometimes called the inner member) attaches to, or receives, the server chassis.
Post spacing: the distance between the front and rear posts. Every rail kit has a supported range.
Cage nut: a clip-in square nut that gives a threaded fixing in a square-hole post.
Tool-less: rails that hook or clip onto the posts without screws, usually designed for square-hole racks first.
Service position: the stop where a sliding server locks part-way out so the lid can be opened.
Getting rail and mounting work done on site
Rail fitting is standard rack and stack work, and our smart hands and data centre support engineers do it in colocation halls and comms rooms. If the rails don’t fit or a part is missing, the engineer records what was found, with photos of the rack posts and the rail kit, and what’s needed. You then order the right part and the return visit is a new ticket.
Engineers can attend under your brand and use your report template, which suits white-label work for your own clients. The site visit report arrives within 24 hours with photos, serial numbers of the servers fitted or removed, and the U positions used. If servers are moving between racks or rooms rather than going in new, that’s usually booked as IMAC work, with the same reporting.
For one-off installs, a field engineer dispatch ticket on an agreed date usually works best. For a hardware refresh across many sites, a multi-site rollout lets you prove the rail fit on a pilot site first, which catches rack compatibility problems before they repeat across every wave. If you’re unsure whether to use remote or on-site help, our post on smart hands services explains what to expect from each.
Frequently asked questions
Can tool-less rails be used in a threaded-hole rack?
Often not directly. Some vendors offer adaptor kits or screw-in rails for round threaded-hole racks, so check the vendor's compatibility details for your server before ordering.
Do we need to supply the rail kit, or does the engineer bring one?
You or your vendor supply the rail kit with the server. The engineer brings standard tools, fits the rails and records the result in the site visit report.
Is it safe for one engineer to rack a heavy server?
Heavy servers should be lifted by two people. If the ticket is for one engineer and several large servers, plan for extra time, a second engineer or a lift aid if the site has one.
What if the rails don't fit when the engineer arrives?
The engineer photographs the rack posts and the rail kit, records what is needed, and the return visit is booked as a new ticket once the right parts are on site.
Need servers racked on site?
Our engineers fit rails and rack servers in data centres and comms rooms. Start with one pilot ticket and no minimum commitment.
Request an engineer